Quick Start (Extended): Keystone Operator on Kind
Looking for the shortest happy-path on macOS with port
8443? See the compact Quick Start. This page is the deep-dive variant with UI tours, fallbacks, the local-build path, the production HelmRelease, E2E and Tempest.
This guide walks through running the Keystone operator on a local kind cluster. It follows the same steps used by the E2E test suite, so the cluster you end up with is identical to what CI validates.
What you get after completing this guide:
- A single-node kind cluster with the full infrastructure stack (cert-manager, MariaDB operator, Memcached operator, External Secrets Operator, OpenBao)
- The Keystone operator running with leader election
- A
Keystonecustom resource that provisions a Keystone API service backed by MariaDB and Memcached
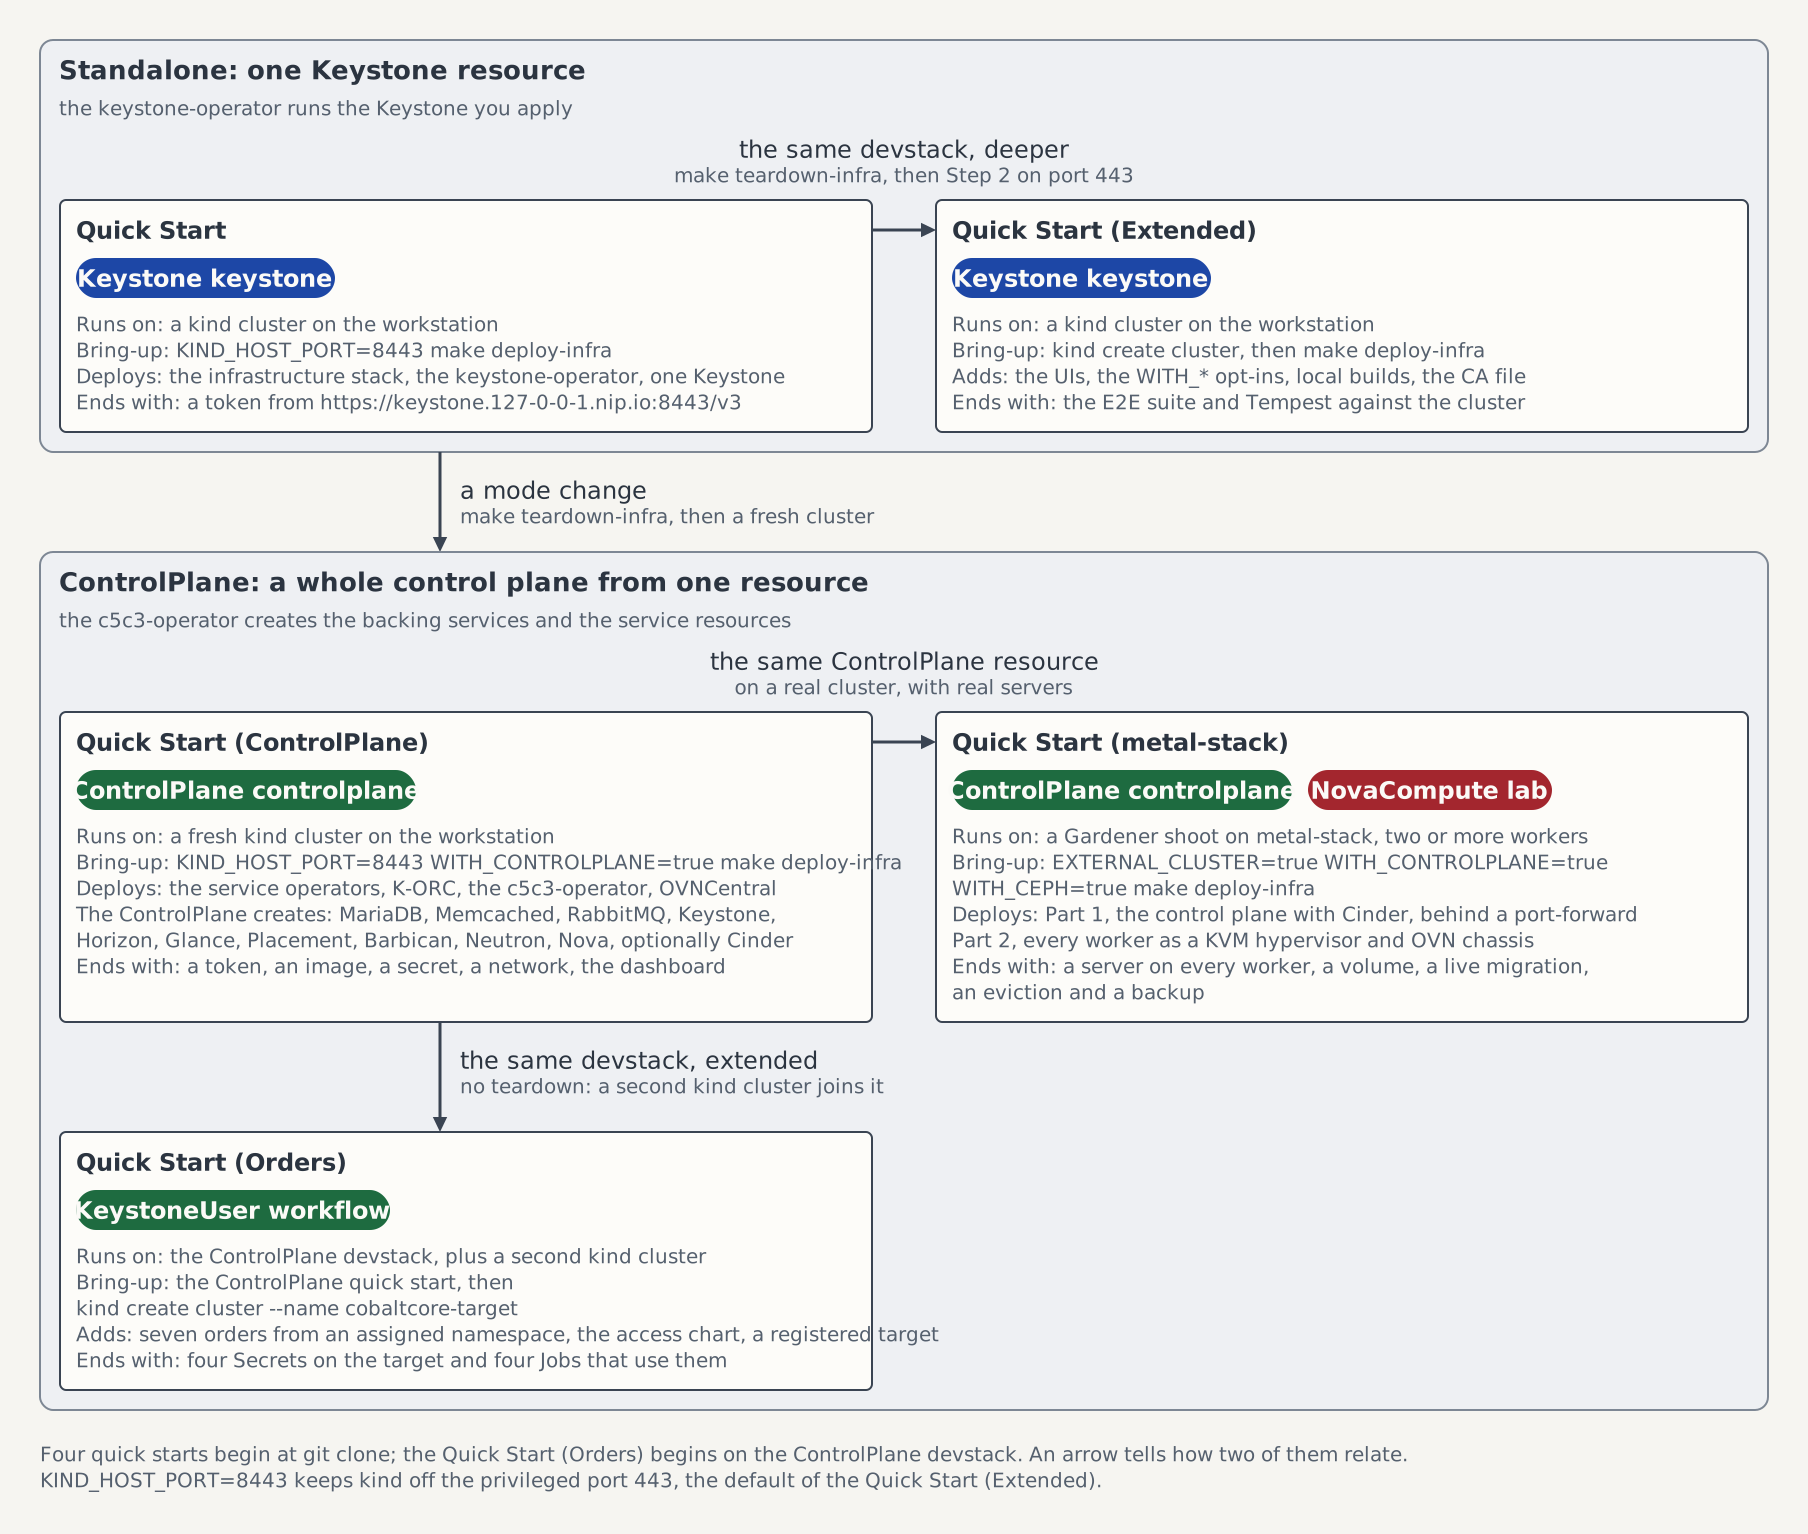
On the map of the five quick starts this page is the box Quick Start (Extended): the devstack of the Quick Start, with every step explained. Step 2 creates the kind cluster cobaltcore on host port 443. The Quick Start creates a cluster of the same name on 8443, so run make teardown-infra first if that cluster still runs.
Prerequisites
System requirements
| Resource | Minimum |
|---|---|
| RAM | 8 GB available to the container runtime |
| CPU | 2 cores |
| Disk | 10 GB free |
Required and optional tools
| Tool | Install |
|---|---|
| Container runtime | Docker or Podman |
| kind | see below |
| kubectl | see below |
| Helm | platform installer |
| jq | platform installer |
Optional: Flux CLI for ad-hoc debugging only. make deploy-infra bootstraps Flux via flux-operator + FluxInstance and does not require the CLI.
Use Docker Desktop on macOS. On Linux, use rootful Docker or Podman if you prefer; the host-port override path documents the privileged-port tradeoffs for those runtimes below.
You need make for the install and deployment targets below. The KIND_HOST_PORT override path also needs yq v4.40.1 or newer on PATH.
Nix users
Instead of make install-test-deps, you can run nix develop to get every tool in the table above, plus controller-gen, gofumpt, golangci-lint, kustomize, chainsaw, and the envtest assets, at the versions CI pins. See Nix Development Environment. Docker still has to be installed separately (kind needs a running daemon).
Step 1 — Clone the repository
git clone https://github.com/c5c3/cobaltcore.git
cd cobaltcore
For Podman, ensure the Podman machine is already running and make kind use the same provider:
export KIND_EXPERIMENTAL_PROVIDER=podmanThe project ships a helper script that downloads and verifies kind and kubectl with pinned SHA256 checksums. The authoritative versions are declared at the top of hack/install-test-deps.sh. Always use that script rather than installing these tools manually, so your versions stay in sync with what CI uses:
make install-test-depsTo also install the optional Flux CLI (for diagnostics only), opt in explicitly:
WITH_FLUX_CLI=true make install-test-depsBy default, binaries are installed to ~/.local/bin. Make sure that directory is in your PATH:
export PATH="${HOME}/.local/bin:${PATH}"Step 2 — Create the kind cluster
The project provides a hack/kind-config.yaml with a single control-plane node configuration:
kind create cluster \
  --name cobaltcore \
  --config hack/kind-config.yaml \
  --wait 60s
Verify the cluster is ready:
kubectl cluster-info --context kind-cobaltcoreHost port 443 binding requirement
The kind config binds host TCP port 443 (mapped to NodePort 31443) so the Quick Start endpointhttps://keystone.127-0-0-1.nip.io/v3 resolves directly from your workstation. Binding a port below 1024 is privileged on every host OS, and the failure mode differs by platform.
Linux requires CAP_NET_BIND_SERVICE, granted by default with rootful Docker. With rootless Docker or Podman, or when the host sets net.ipv4.ip_unprivileged_port_start to 443 or higher, kind create cluster fails with failed to start container … bind: permission denied on port 443.
macOS Docker Desktop binds privileged ports through a system helper (vmnetd) at /var/run/com.docker.vmnetd.sock. When that socket is missing, kind create cluster fails with connecting to /var/run/com.docker.vmnetd.sock: dial unix … no such file or directory. It is commonly missing after a user-mode install of Docker Desktop, or when you are using Colima / OrbStack / Rancher Desktop. Fix it by enabling Docker Desktop → Settings → Advanced → "Allow privileged port mapping" (Docker prompts for an admin password and installs the helper), or run sudo /Applications/Docker.app/Contents/MacOS/install vmnetd and restart Docker Desktop. Other Docker runtimes do not ship vmnetd. Use the override below instead.
Override the host port without privileged binding (any OS): export KIND_HOST_PORT before make deploy-infra and the script renders a non-privileged kind config on the fly. The Envoy proxy still listens on NodePort 31443 inside the cluster; only the host-side bind moves.
export KIND_HOST_PORT=8443
make deploy-infra
# Endpoint becomes https://keystone.127-0-0-1.nip.io:8443/v3 — your
# Keystone CR's `spec.bootstrap.publicEndpoint` must include the same
# `:8443` suffix so the issued service catalog matches the reachable URL.
# See Step 7 for a ready-to-apply CR example.
The KIND_HOST_PORT override needs yq on PATH (only required when the value differs from 443). The Chainsaw E2E suites under tests/e2e/keystone/gateway-quick-start* hard-code the default https://keystone.127-0-0-1.nip.io/v3 URL and will not pass with an override. Use the kubectl port-forward fallback for those suites, or run them in CI (Linux + rootful Docker).
The same kind config also binds host loopback port 8428 (mapped to NodePort 30428) unconditionally, so you can enable the opt-in dizzy load/chaos stack (WITH_DIZZY=true) later without recreating the cluster. Port 8428 must therefore be free even for a plain make deploy-infra. If another process already holds it, kind create cluster fails with port is already allocated; a local VictoriaMetrics binds 8428 by default. Free the port (or stop that process) before creating the cluster.
Step 3 — Deploy the infrastructure stack
The deploy-infra target runs an 8-step deployment sequence that installs and configures all dependencies the Keystone operator needs:
make deploy-infraThe figure shows the run with its waits and with the step each opt-in changes. Deployment Sequence describes every step of the run in full, with each wait and the variable that bounds it.
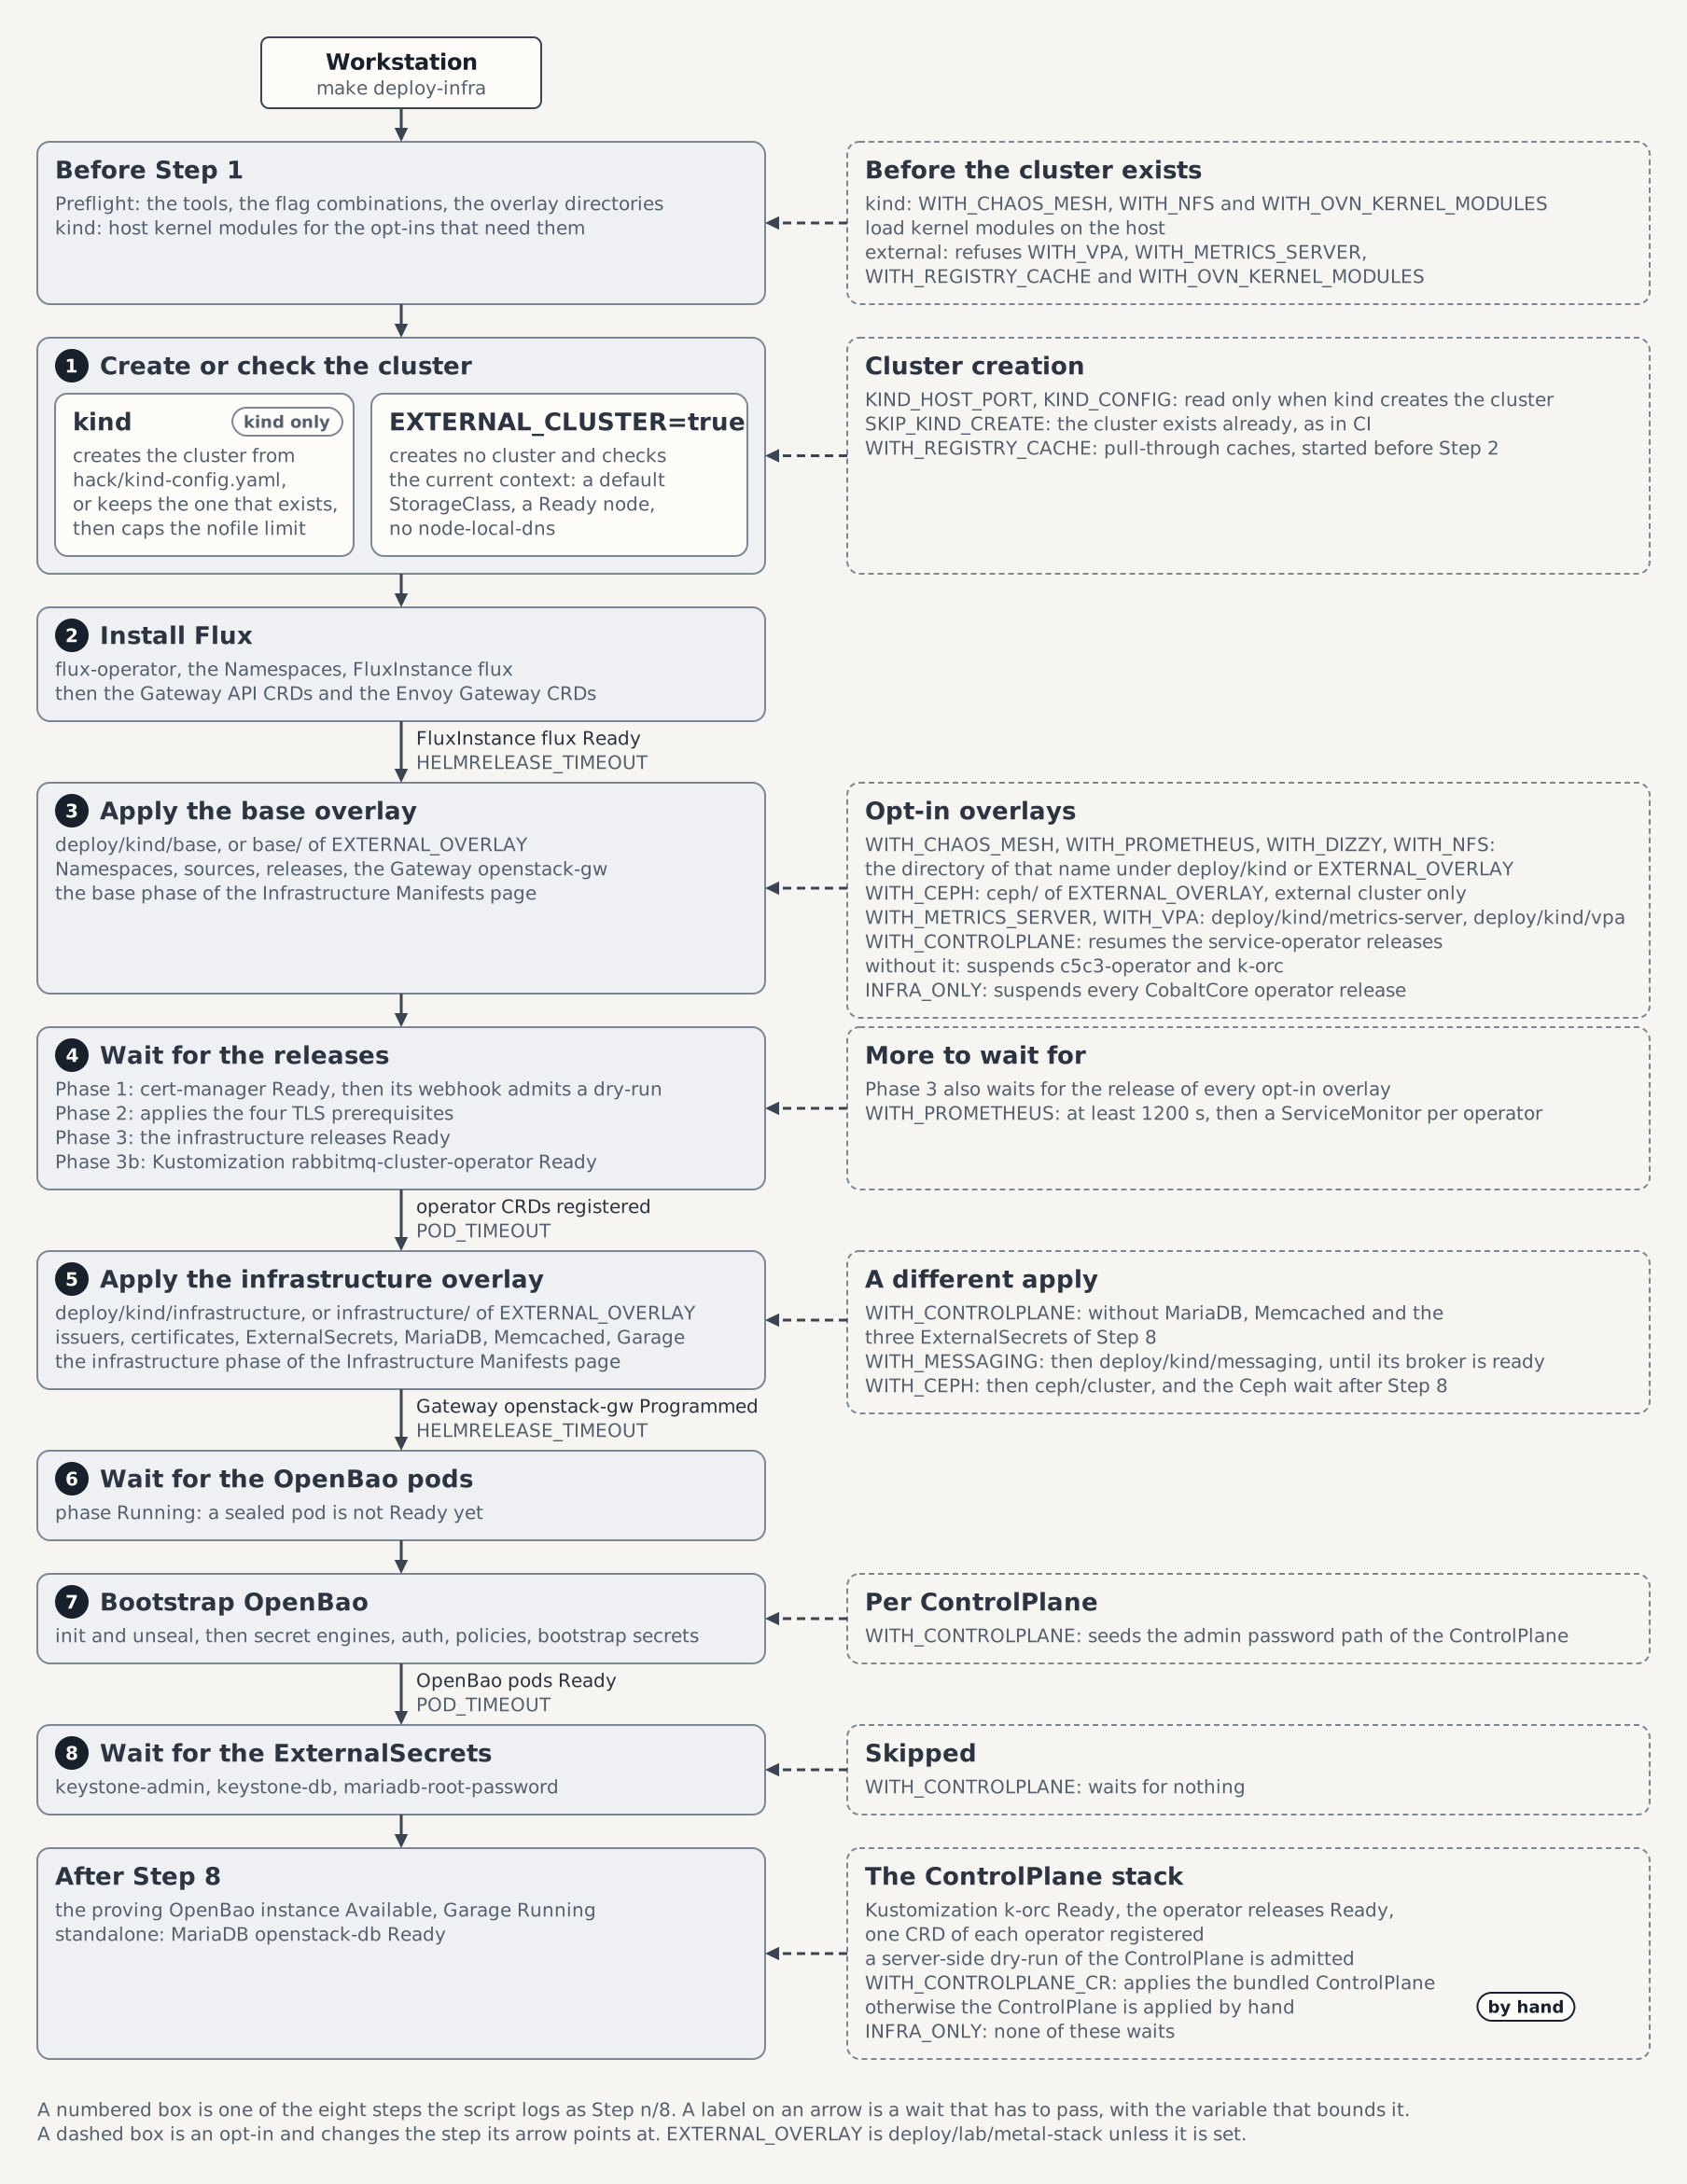
The table sums the steps up. Rows 2a and 2b are the two CRD installs that end Step 2. The Deployment Sequence linked above has the details of every step.
| Step | What happens |
|---|---|
| 1 | The kind cluster already exists from Step 2 of this page, so the script keeps it. |
| 2 | Install flux-operator and apply FluxInstance/flux, then wait until the instance is Ready. |
| 2a | Install the Gateway API CRDs of GATEWAY_API_VERSION. The keystone-operator watches HTTPRoute. |
| 2b | Install the Envoy Gateway CRDs of ENVOY_GATEWAY_VERSION. The envoy-gateway release and Gateway/openstack-gw follow in Step 3, and Keystone attaches its HTTPRoute in Step 7 of this page. |
| 3 | Apply the base overlay deploy/kind/base: namespaces, sources, releases and the Gateway. |
| 4 | Wait for the releases in four phases, cert-manager first and the rabbitmq-cluster-operator Kustomization last. |
| 5 | Apply the infrastructure overlay deploy/kind/infrastructure and wait until Gateway/openstack-gw is Programmed. |
| 6 | Wait for the OpenBao pod to reach the phase Running. |
| 7 | Bootstrap OpenBao: initialise, unseal, configure, and seed the bootstrap secrets. |
| 8 | Wait for the ExternalSecrets keystone-admin, keystone-db and mariadb-root-password to sync. |
The script also triggers a re-reconciliation of the openstack-db MariaDB CR and waits for it to become Ready before returning.
ExternalSecret shims of the kind overlay
The keystone-admin, keystone-db, and mariadb-root-password ExternalSecrets applied in Step 5 and awaited in Step 8 are kind-overlay shims (deploy/kind/infrastructure/) that keep this standalone Keystone flow self-contained. The production stack (deploy/eso/) ships only the ClusterSecretStore: in a ControlPlane-based deployment the admin password is projected per ControlPlane by the c5c3-operator, and the MariaDB root password is expected from a non-kind Flux MariaDB baseline.
Expected duration: 5 to 10 minutes on first run.
Configurable timeouts
Override the default timeouts via environment variables if your machine is slow:
HELMRELEASE_TIMEOUT=900 POD_TIMEOUT=600 make deploy-infraInspect the Flux installation
flux-operator publishes a FluxReport/flux that summarizes the state of every Flux controller, its version, and the entitlement status. Inspect it at any time:
kubectl get fluxreport/flux -n flux-system -o yamlWhat gets deployed
After make deploy-infra completes the following are running in the cluster:
flux-system           flux-operator-*                Ready (reconciles FluxInstance/flux)
flux-system           source-controller-*            Ready
flux-system           kustomize-controller-*         Ready
flux-system           helm-controller-*              Ready
flux-system           notification-controller-*      Ready
flux-system           flux-web-*                     Ready (kind-only; see Step 4a)
envoy-gateway-system  envoy-gateway-*                Ready (kind-only; provides openstack-gw — see Step 2b)
cert-manager          cert-manager-*         Ready
mariadb-system        mariadb-operator-*     Ready
memcached-system      memcached-operator-*   Ready
external-secrets      external-secrets-*     Ready
shared-services       openbao-0              Ready (unsealed; kind overlay enables the UI on :8200 — see Step 4b)
openstack             openstack-db-*         Ready (MariaDB cluster)
openstack             openstack-memcached-*  Ready (Memcached cluster)
headlamp-system       headlamp-*             Starting (kind-only demo UI, not waited on)
monitoring            kube-prometheus-stack-prometheus-*   Ready (kind-only; WITH_PROMETHEUS=true; see Step 4c)
monitoring            kube-prometheus-stack-grafana-*      Ready (kind-only; WITH_PROMETHEUS=true; see Step 4c)
monitoring            kube-prometheus-stack-operator-*     Ready (kind-only; WITH_PROMETHEUS=true; see Step 4c)
kube-system           metrics-server-*                     Ready (kind-only; WITH_METRICS_SERVER=true)
kube-system           vertical-pod-autoscaler-recommender-*  Ready (kind-only; WITH_VPA=true)
dizzy                 dizzy-victoria-metrics-server-*      Ready (kind-only; WITH_DIZZY=true)
dizzy                 dizzy-grafana-*                      Ready (kind-only; WITH_DIZZY=true)
Headlamp is deployed asynchronously and is not part of the deploy-infra wait list: a broken upstream chart release must never block E2E runs. Step 4 below waits for it explicitly at the point you actually need the UI.
The OpenBao UI is served by the same openbao Service that backs the bootstrap scripts; the kind overlay flips ui = true in the standalone Raft config, while the production flux-system overlay keeps it disabled.
The openstack namespace also holds the synced secrets:
openstack   keystone-admin        (admin password from OpenBao)
openstack   keystone-db           (database credentials from OpenBao)
Enabling Chaos Mesh
Chaos Mesh is not installed by default in the kind Quick Start. The default make deploy-infra flow leaves the chaos-mesh namespace absent so first-run deployments are faster and do not require the chaos-daemon privileged DaemonSet on hosts that don't need it. Production overlays (deploy/flux-system/) also explicitly omit Chaos Mesh.
Opt in by setting WITH_CHAOS_MESH=true before make deploy-infra:
WITH_CHAOS_MESH=true make deploy-infraThis applies the kind-only overlay at deploy/kind/chaos-mesh/, loads the chaos-daemon kernel modules on the kind node, and waits for the Chaos Mesh HelmRelease to become Ready alongside the other operators. It is required before running the chaos E2E suites; Chaos E2E Tests has the full prerequisite list and make e2e-chaos workflow.
Re-running deploy-infra
make deploy-infra is idempotent: a re-run with the same parameters converges and leaves a healthy stack unchanged, and you can enable each WITH_* opt-in below later by re-running against the existing cluster. Only the newly enabled components are installed.
Two caveats apply. WITH_REGISTRY_CACHE=true only becomes fully active on a cluster created with it. On a pre-existing cluster the deploy prints a warning that the mirrors stay inert until the cluster is recreated with the flag. And flipping WITH_CONTROLPLANE=true on an already-provisioned standalone stack is a mode change, not an additive opt-in: the ControlPlane provisions its own MariaDB/Memcached. Use a fresh cluster (make teardown-infra first).
Removing a previously enabled flag does not uninstall that component; cleanup is make teardown-infra's job.
Enabling Prometheus & Grafana
The kube-prometheus-stack is not installed by default in the kind Quick Start. The default make deploy-infra flow puts no workload into the monitoring namespace, so first-run deployments stay lean and do not pin extra CPU/memory on a developer laptop. Production overlays (deploy/flux-system/) also omit the stack, because production clusters wire their own Prometheus.
Opt in by setting WITH_PROMETHEUS=true before make deploy-infra:
WITH_PROMETHEUS=true make deploy-infraThis applies the kind-only overlay at deploy/kind/prometheus/, waits for the kube-prometheus-stack HelmRelease to become Ready, and patches the keystone-operator HelmRelease to enable its ServiceMonitor. Use it when you want to visualise the keystone-operator metrics live (reconcile p95, error rate); Step 4c — Open the Grafana UI has the port-forward and the bundled Keystone Operator dashboard.
Enabling metrics-server
metrics-server is not installed by default in the kind Quick Start. The default make deploy-infra flow leaves the kube-system metrics-server absent so first-run deployments stay lean. Production overlays (deploy/flux-system/) also omit it, because managed distributions ship their own.
Opt in by setting WITH_METRICS_SERVER=true before make deploy-infra:
WITH_METRICS_SERVER=true make deploy-infraThis applies the kind-only overlay at deploy/kind/metrics-server/ and waits for the metrics-server HelmRelease to become Ready. It is the prerequisite for the Autoscaling (HPA) recipe: without it the generated HorizontalPodAutoscaler reports unknown/80% and never scales.
WITH_VPA=true make deploy-infra installs metrics-server too, together with the VPA CRDs and the kind-only VPA recommender at deploy/kind/vpa/. The CI sizing measurement reads the recommender, and the e2e-autoscaling job deploys it so the operators create the VerticalPodAutoscalers a verticalAutoscaling block opts into (VPA recommender).
Enabling the dizzy load/chaos stack
The dizzy load/chaos stack is not installed by default in the kind Quick Start, and the production overlays (deploy/flux-system/) ship none of it. Opt in by setting WITH_DIZZY=true before make deploy-infra:
WITH_DIZZY=true make deploy-infraThis applies the kind-only overlay at deploy/kind/dizzy/ and waits for the dizzy-victoria-metrics and dizzy-grafana HelmReleases to become Ready. Grafana serves the dizzy dashboards at https://dizzy.127-0-0-1.nip.io; append :<KIND_HOST_PORT> when that override is set to something other than 443. To drive a soak, run the make dizzy-keystone or make dizzy-glance targets documented in dizzy Chaos Testing.
Enabling the local registry pull-through cache
Every fresh kind cluster pulls every third-party image (from docker.io, ghcr.io, registry.k8s.io, quay.io, and the per-project vanity registries oci.external-secrets.io and docker-registry3.mariadb.com) from its upstream registry inside the node's containerd. If you recreate the cluster many times a day, the same images are fetched over the wire again and again. That is slow, and it exposes you to Docker Hub rate limits and transient upstream flakes. kind load docker-image only helps for the handful of images you build yourself; it does nothing for the dozen-plus third-party images the infra stack pulls.
Opt in to a transparent local pull-through cache by setting WITH_REGISTRY_CACHE=true before make deploy-infra:
WITH_REGISTRY_CACHE=true make deploy-infraThis starts one small distribution registry (registry:2) container per upstream registry, in pull-through proxy mode, on the kind Docker network, and wires every node's containerd at them via a registry mirror (/etc/containerd/certs.d/<host>/hosts.toml). Each registry is backed by a persistent Docker volume, so the cache survives kind delete and recreate cycles. It is fully transparent: no spec.image or chart image: edits, no localhost:5000/... rewrites. A workload referencing ghcr.io/c5c3/keystone:2026.1 is served from the local cache on the second pull, and the distribution proxy streams each blob from the upstream while caching it inline, so even the first (cold) pull runs at roughly origin speed. Mirror entries advertise pull + resolve capabilities, so containerd falls back to the origin registry whenever a cache is down. The cache can never hard-break a pull.
This is local-dev only. The default make deploy-infra (flag unset) and every CI job are unaffected: the containerd mirror patch is injected only into the deploy-time kind config, never into the checked-in hack/kind-config.yaml that CI feeds to kind directly. CI runners are ephemeral, so a host-local cache would not persist across jobs anyway.
A plain make teardown-infra leaves the caches running for the next deploy. To reclaim the disk and start cold, purge them explicitly:
PURGE_REGISTRY_CACHE=true make teardown-infraBecause the containerd mirror is configured at cluster-creation time, enabling the cache takes effect on a freshly created cluster (make teardown-infra then WITH_REGISTRY_CACHE=true make deploy-infra).
Step 4 — Open the Headlamp UI
The kind overlay ships Headlamp with the Flux plugin preloaded, so you can watch Steps 5 to 9 reconcile live (and, if you enabled WITH_PROMETHEUS=true, jump to Step 4c for the Grafana UI). Wait for the HelmRelease to become Ready, then get a token, port-forward, and open the UI:
kubectl wait helmrelease/headlamp \
  -n headlamp-system \
  --for=condition=Ready \
  --timeout=300s

kubectl create token headlamp -n headlamp-system --duration=8h
kubectl port-forward svc/headlamp -n headlamp-system 8080:80
Open http://localhost:8080, paste the token. The sidebar shows Flux → Helm Releases / Kustomizations / Sources alongside the standard resources. The headlamp ServiceAccount is bound to a read-only ClusterRole covering Flux toolkit API groups and the CobaltCore CRDs.
Accessing the Flux UI
The Headlamp Flux plugin is the primary Flux UI used by this project. The flux-operator also ships an embedded Flux Web UI (fluxoperator.dev/web-ui) that the kind overlay turns on as a demo addon; Step 4a — Open the Flux Web UI covers how to reach it. Once Headlamp is open and you are authenticated, click Flux in the left sidebar to switch into the Flux views:
| Pane | Shows |
|---|---|
| Helm Releases | Every HelmRelease with reconciliation status, last applied revision, and the values that were rendered |
| Kustomizations | Kustomization objects (empty in the kind Quick Start — the FluxInstance here has no spec.sync block) |
| Sources | HelmRepository objects (and GitRepository/OCIRepository if present) with the last successful fetch and artifact revision |
| Flux Runtime | The flux-operator's FluxInstance/flux and FluxReport/flux — controller versions, reconciliation state, entitlement status |
Use this instead of the legacy flux get / flux logs CLI. All state the CLI would print is rendered live here, and every resource row links to the controller logs and Kubernetes events that produced it.
Step 4a — Open the Flux Web UI
The kind overlay also ships the flux-operator's own Flux Web UI as a demo surface (and, alongside it, the optional Grafana UI from Step 4c when WITH_PROMETHEUS=true). This is a kind-only convenience. The production deploy/flux-system/ overlay keeps the Web UI disabled (no token, no TLS, no Ingress) until the upstream project ships token auth, TLS termination, and an Ingress story suitable for a shared cluster. Forward the service port and browse directly:
kubectl port-forward svc/flux-web -n flux-system 9080:9080Then open http://localhost:9080. No login is required.
The Web UI complements Headlamp (Step 4) by rendering the three flux-operator-specific Custom Resources that the generic Headlamp Flux plugin does not know about: ResourceSet and ResourceSetInputProvider (the operator's templating primitives) and FluxReport (the rolled-up installation status of every Flux controller). Standard HelmRelease, Kustomization, and Source views are still easier to read in Headlamp.
Step 4b — Open the OpenBao UI
The kind overlay enables the OpenBao web UI as a demo surface (the optional Grafana UI is covered separately in Step 4c). This is a kind-only convenience. The production flux-system overlay keeps ui = false in the HA Raft config. Forward the client port and log in with the root token that make deploy-infra already seeded into the cluster:
kubectl port-forward svc/openbao -n shared-services 8200:8200Service selection:
kubectl get svc -n shared-serviceslists both OpenBao services (alongside the Garage ones sharing that namespace). Forwardsvc/openbao(the clientClusterIPservice that also fronts the UI), notsvc/openbao-internal(the headless Service used for Raft peer discovery between OpenBao pods).
In a second terminal, extract the root token from the openbao-init-keys Secret:
export BAO_TOKEN=$(kubectl get secret openbao-init-keys -n shared-services \
  -o jsonpath='{.data.init-output}' | base64 -d | jq -r '.root_token')
echo "$BAO_TOKEN"
Present a client certificate (mutual TLS)
The listener enforces mutual TLS: every connection must present a client certificate that chains to the in-cluster CA before the application-layer token login runs. A browser without one never reaches the login screen: the TLS handshake is reset, which the tooling surfaces as connection reset by peer / lost connection to pod. The kind overlay matches the production mTLS posture here.
Build a PKCS#12 bundle from the openbao-client-tls Secret. Its keypair is signed by the same CA as the server cert, openbao-ca (ClusterIssuer openbao-ca-issuer), and the listener verifies only chain-to-CA (not SANs) on client auth, so this certificate is accepted:
kubectl get secret openbao-client-tls -n shared-services \
  -o jsonpath='{.data.tls\.crt}' | base64 -d > openbao-client.crt
kubectl get secret openbao-client-tls -n shared-services \
  -o jsonpath='{.data.tls\.key}' | base64 -d > openbao-client.key
kubectl get secret openbao-client-tls -n shared-services \
  -o jsonpath='{.data.ca\.crt}'  | base64 -d > openbao-ca.crt
# The passphrase only protects this throwaway local .p12 during the browser
# import — it is not an OpenBao credential, so pick any value you like.
openssl pkcs12 -export -inkey openbao-client.key -in openbao-client.crt \
  -certfile openbao-ca.crt -name "OpenBao Client (kind)" \
  -out openbao-client.p12 -passout pass:changeit
Import the bundle into Firefox once. This walkthrough is verified with Firefox; Chrome, Edge, and Safari also accept client certificates but import them through the OS keychain / system certificate store, so the menu path differs:
- Settings → Privacy & Security → Certificates → View Certificates…
- Tab Your Certificates → Import… → select
openbao-client.p12and enter the passphrase you chose above. - (Optional: removes the trust warning.) Tab Authorities → Import… → select
openbao-ca.crt→ tick "Trust this CA to identify websites". The server cert carriesIP:127.0.0.1as a SAN, sohttps://localhost:8200then validates cleanly.
Open https://localhost:8200/ui/. Firefox asks which client certificate to send: pick "OpenBao Client (kind)", then paste the root token to sign in.
For the full token lifecycle, secret engines, auth methods, and the bootstrap sequence that produced this token, see OpenBao Bootstrap Procedure — Running the Full Bootstrap.
Step 4c — Open the Grafana UI
The kind overlay can ship a slimmed-down kube-prometheus-stack (Prometheus + Grafana + the prometheus-operator) under the monitoring namespace. This is a kind-only opt-in: production overlays (deploy/flux-system/) omit the stack so production clusters can wire their own Prometheus. If you have not already opted in, see the Enabling Prometheus & Grafana tip in Step 3 (WITH_PROMETHEUS=true make deploy-infra).
Forward the Grafana service port:
kubectl port-forward svc/kube-prometheus-stack-grafana -n monitoring 3000:80Open http://localhost:3000 and sign in with the chart's default credentials:
username: admin
password: prom-operator
Default credentials only: these are the upstream
kube-prometheus-stackdefaults baked into the kind overlay for convenience. Do not reuse them in any cluster reachable beyond your laptop.
Once signed in, navigate to Dashboards → Keystone Operator to see the bundled dashboard sourced from operators/keystone/dashboards/keystone-operator.json (reconcile p95, error rate, and the keystone-operator metrics).
Sanity-check: Prometheus targets
In a second terminal, port-forward Prometheus and confirm the keystone-operator ServiceMonitor scrape target is up. The query path (/api/v1/targets?state=active) is the same one the chainsaw suite issues against the in-cluster Service, so a green local check matches what CI exercises:
kubectl port-forward svc/kube-prometheus-stack-prometheus -n monitoring 9090:9090
curl -fsS 'http://localhost:9090/api/v1/targets?state=active' \
  | jq '.data.activeTargets[] | select(.labels.job=="keystone-operator") | {health, lastScrape: .lastScrape}'
A healthy target reports "health": "up"; an empty result means the keystone-operator HelmRelease has not been patched yet. Re-run WITH_PROMETHEUS=true make deploy-infra so the deploy script can flip monitoring.serviceMonitor.enabled=true.
For non-kind clusters (production overlays, shared dev clusters, anything that already runs Prometheus), follow Enable Keystone Operator Metrics instead. That guide covers wiring an externally-managed Prometheus to the operator's ServiceMonitor and is the canonical non-kind path.
Step 5 — Deploy the Keystone operator
The Keystone operator is distributed as a Helm chart. There are two ways to deploy it depending on your goal.
Option A — From GHCR (recommended for users)
Install the published chart directly from the GHCR OCI registry. Flux reconciles updates automatically:
# Add the HelmRepository source (already present if you ran make deploy-infra)
kubectl apply -f deploy/flux-system/sources/c5c3-charts.yaml

# Apply the HelmRelease — Flux installs the chart and keeps it reconciled
kubectl apply -f deploy/flux-system/releases/keystone-operator.yaml

# Wait until the operator is Ready
kubectl wait helmrelease/keystone-operator \
  -n keystone-system \
  --for=condition=Ready \
  --timeout=120s
The HelmRelease references chart version >=0.1.0 <1.0.0 from the c5c3-charts repository and deploys 2 replicas with leader election enabled.
Option B — From the local Helm chart (recommended for development)
Build the operator image, load it into kind, and install the chart directly from the repository. Step 1 builds the image with Nix, so it needs Nix with flakes on a Linux host; on macOS, use Option A. See Build and load locally.
# 1. Build the operator image
make image OPERATOR=keystone IMG=ghcr.io/c5c3/keystone-operator:dev

# 2. Load the image into the kind cluster (no registry needed)
kind load docker-image ghcr.io/c5c3/keystone-operator:dev --name cobaltcore

# 3. Pre-install CRDs so the API server watch cache is ready before the
#    operator starts (avoids missing initial watch events)
kubectl apply -f operators/keystone/helm/keystone-operator/crds/
kubectl wait crd --all --for condition=Established --timeout=60s

# 4. Install the chart
helm install keystone-operator \
  operators/keystone/helm/keystone-operator/ \
  -n keystone-system --create-namespace \
  --set image.repository=ghcr.io/c5c3/keystone-operator \
  --set image.tag=dev \
  --set image.pullPolicy=Never \
  --wait --timeout 120s
Verify the operator is running
kubectl get pods -n keystone-system -l app.kubernetes.io/name=keystone-operatorExpected output:
NAME                                  READY   STATUS    RESTARTS   AGE
keystone-operator-6d7f9f4d5b-abc12   1/1     Running   0          30s
keystone-operator-6d7f9f4d5b-xyz99   1/1     Running   0          30s
Step 6 — Prepare and load the Keystone service image
The Keystone CR references a service image that runs the actual OpenStack Keystone API. Either pull the pre-built image from GHCR or build it locally. Run one option only; both options produce the same image reference and load it into the cobaltcore kind cluster.
Set the release you want to work with. The default is the most recent release; update this variable whenever a new release is available:
RELEASE=2026.1 # update to the target releaseOption A — Pull from GHCR (recommended)
docker pull ghcr.io/c5c3/keystone:"${RELEASE}"
kind load docker-image ghcr.io/c5c3/keystone:"${RELEASE}" --name cobaltcore
With Podman, keep KIND_EXPERIMENTAL_PROVIDER=podman exported from the Prerequisites step:
podman pull ghcr.io/c5c3/keystone:"${RELEASE}"
kind load docker-image ghcr.io/c5c3/keystone:"${RELEASE}" --name cobaltcore
Option B — Build locally
The keystone image is a flake attribute of the repository (Nix Image Build). The build needs Nix with flakes enabled:
# Build the image of the release and load it (replace `docker` with `podman`
# when using Podman)
nix build ".#keystone-${RELEASE//./_}-image"
./result | docker load

# Name it the way the Keystone CR references it
docker tag "keystone:${RELEASE}" "ghcr.io/c5c3/keystone:${RELEASE}"

# Load into kind
kind load docker-image "ghcr.io/c5c3/keystone:${RELEASE}" --name cobaltcore
Step 7 — Create a Keystone CR
Apply the following manifest to deploy a Keystone instance in managed mode. In this mode the operator creates and manages the MariaDB database (via clusterRef) and configures Memcached for session caching. The spec.gateway block attaches the Keystone API to the openstack-gw Gateway provisioned in Step 2b, so the service is reachable at https://keystone.127-0-0-1.nip.io/v3 from your workstation with no port-forward. Replace <RELEASE> with the same value used in Step 6 (e.g. 2026.1):
# keystone.yaml
apiVersion: keystone.openstack.c5c3.io/v1alpha1
kind: Keystone
metadata:
  name: keystone
  namespace: openstack
spec:
  deployment:
    replicas: 3
  image:
    repository: ghcr.io/c5c3/keystone
    tag: "<RELEASE>"   # e.g. 2026.1, must match the image loaded in Step 6
  database:
    clusterRef:
      name: openstack-db
    database: keystone
    secretRef:
      name: keystone-db
  cache:
    clusterRef:
      name: openstack-memcached
    backend: dogpile.cache.pymemcache
  fernet:
    rotationSchedule: "0 0 * * 0"   # weekly rotation, every Sunday at midnight
    maxActiveKeys: 3
  bootstrap:
    adminUser: admin
    adminPasswordSecretRef:
      name: keystone-admin
    region: RegionOne
  # Gateway API attachment — routes https://keystone.127-0-0-1.nip.io/v3 to
  # the keystone Service via the shared openstack-gw Gateway.
  gateway:
    parentRef:
      name: openstack-gw
    hostname: keystone.127-0-0-1.nip.io
    path: /
Why 127-0-0-1.nip.io?
nip.io is a free wildcard DNS service: any hostname of the form anything.<ip-with-dashes>.nip.io resolves to <ip>. keystone.127-0-0-1.nip.io therefore resolves to 127.0.0.1 without touching /etc/hosts, which pairs with the hostPort: 443 → containerPort: 31443 mapping in hack/kind-config.yaml.
kubectl apply -f keystone.yamlVariant — when KIND_HOST_PORT=8443 was used in Step 2
If you exported KIND_HOST_PORT=8443 before make deploy-infra, the endpoint is reachable at https://keystone.127-0-0-1.nip.io:8443/v3 instead of the default :443. The Gateway API hostname field stays unchanged (Gateway API hostnames carry no port, since the HTTPRoute matches the SNI / Host header), but spec.bootstrap.publicEndpoint must be set explicitly so the issued service catalog points at the same :8443 URL external clients reach. Apply this CR instead:
# keystone.yaml
apiVersion: keystone.openstack.c5c3.io/v1alpha1
kind: Keystone
metadata:
  name: keystone
  namespace: openstack
spec:
  deployment:
    replicas: 3
  image:
    repository: ghcr.io/c5c3/keystone
    tag: "<RELEASE>"   # e.g. 2026.1, must match the image loaded in Step 6
  database:
    clusterRef:
      name: openstack-db
    database: keystone
    secretRef:
      name: keystone-db
  cache:
    clusterRef:
      name: openstack-memcached
    backend: dogpile.cache.pymemcache
  fernet:
    rotationSchedule: "0 0 * * 0"
    maxActiveKeys: 3
  bootstrap:
    adminUser: admin
    adminPasswordSecretRef:
      name: keystone-admin
    region: RegionOne
    # Catalog URL must include the host-side port that KIND_HOST_PORT set.
    publicEndpoint: https://keystone.127-0-0-1.nip.io:8443/v3
  gateway:
    parentRef:
      name: openstack-gw
    hostname: keystone.127-0-0-1.nip.io   # no port — Gateway API hostnames are SNI/Host only
    path: /
When verifying access (see Access Keystone from your local machine), substitute :8443 everywhere the default guide writes https://keystone.127-0-0-1.nip.io/v3, e.g. export OS_AUTH_URL=https://keystone.127-0-0-1.nip.io:8443/v3.
kubectl get keystone will report the same :8443 URL in the ENDPOINT column once the CR reconciles: the operator mirrors spec.bootstrap.publicEndpoint into status.endpoint whenever it is set, so the externally reachable URL, the issued service catalog, and status.endpoint stay aligned. The webhook rejects a publicEndpoint whose host differs from spec.gateway.hostname, so drift between the catalog URL and the HTTPRoute hostname is caught at admission time.
Step 8 — Wait for Keystone to become Ready
The operator reconciles the CR through sixteen sub-conditions before the aggregate Ready condition is set. All are always reported; conditions tied to an optional spec field carry a "not required" / "disabled" reason when that field is unset:
| Condition | What it waits for |
|---|---|
SecretsReady | keystone-db and keystone-admin Secrets are available |
FernetKeysReady | Fernet key Secret and CronJob created |
CredentialKeysReady | Credential key Secret and rotation CronJob exist (spec.credentialKeys tunes schedule and max active keys) |
DatabaseReady | db_sync Job completed successfully |
DatabaseTLSReady | Database TLS client certificate issued, or NotRequired when spec.database.tls is unset |
PolicyValidReady | spec.policyOverrides validated against oslo.policy |
DeploymentReady | Keystone API Deployment has available replicas |
KeystoneAPIReady | Keystone API is responding to /v3 health probes |
HPAReady | HorizontalPodAutoscaler created (if spec.autoscaling is set) |
VPAReady | VerticalPodAutoscaler applied, or VPANotRequired when spec.deployment.verticalAutoscaling is unset |
NetworkPolicyReady | NetworkPolicy created (if spec.networkPolicy is set) |
HTTPRouteReady | Gateway API HTTPRoute reconciled, or not required when spec.gateway is unset |
BootstrapReady | Bootstrap Job completed (admin user, region, endpoints) |
TrustFlushReady | Trust-flush CronJob created (defaults to hourly) |
PasswordRotationReady | Scheduled admin-password rotation reconciled, or RotationDisabled when spec.passwordRotation is unset |
IdentityBackendsReady | Attached identity backends projected, or IdentityBackendsNotRequired when none is attached |
Watch the conditions with:
kubectl get keystone keystone -n openstack -wOr wait for Ready=True:
kubectl wait keystone/keystone \
  -n openstack \
  --for=condition=Ready \
  --timeout=5m
Expected output (once reconciled):
keystone.keystone.openstack.c5c3.io/keystone condition metStep 9 — Verify the deployment
Check all owned resources
# Deployment and Service
kubectl get deployment,service -n openstack -l app.kubernetes.io/instance=keystone

# Fernet rotation CronJob and Secret
kubectl get cronjob,secret -n openstack -l app.kubernetes.io/instance=keystone

# ConfigMap (name includes a content-hash suffix)
kubectl get cm -n openstack | grep keystone-config-
Query the Keystone API
Run a one-shot pod inside the cluster to reach the API service:
kubectl run curl-test \
  --image="ghcr.io/c5c3/keystone:${RELEASE}" \
  --rm -i --restart=Never \
  --command -- python3 -c \
  "import urllib.request; print(urllib.request.urlopen('http://keystone.openstack.svc:5000/v3').read().decode())"
A successful response returns a JSON document beginning with {"version": {"id": "v3", ...}}.
Inspect conditions in detail
kubectl get keystone keystone -n openstack -o jsonpath='{.status.conditions}' | jq .Access Keystone from your local machine
The Keystone CR from Step 7 attaches to the openstack-gw Gateway and is exposed at https://keystone.127-0-0-1.nip.io/v3. The kind cluster's extraPortMappings bridges the host's TCP :443 to the Envoy proxy's NodePort 31443, so the endpoint resolves directly to 127.0.0.1 via the nip.io wildcard DNS service, with no /etc/hosts edit and no kubectl port-forward required.
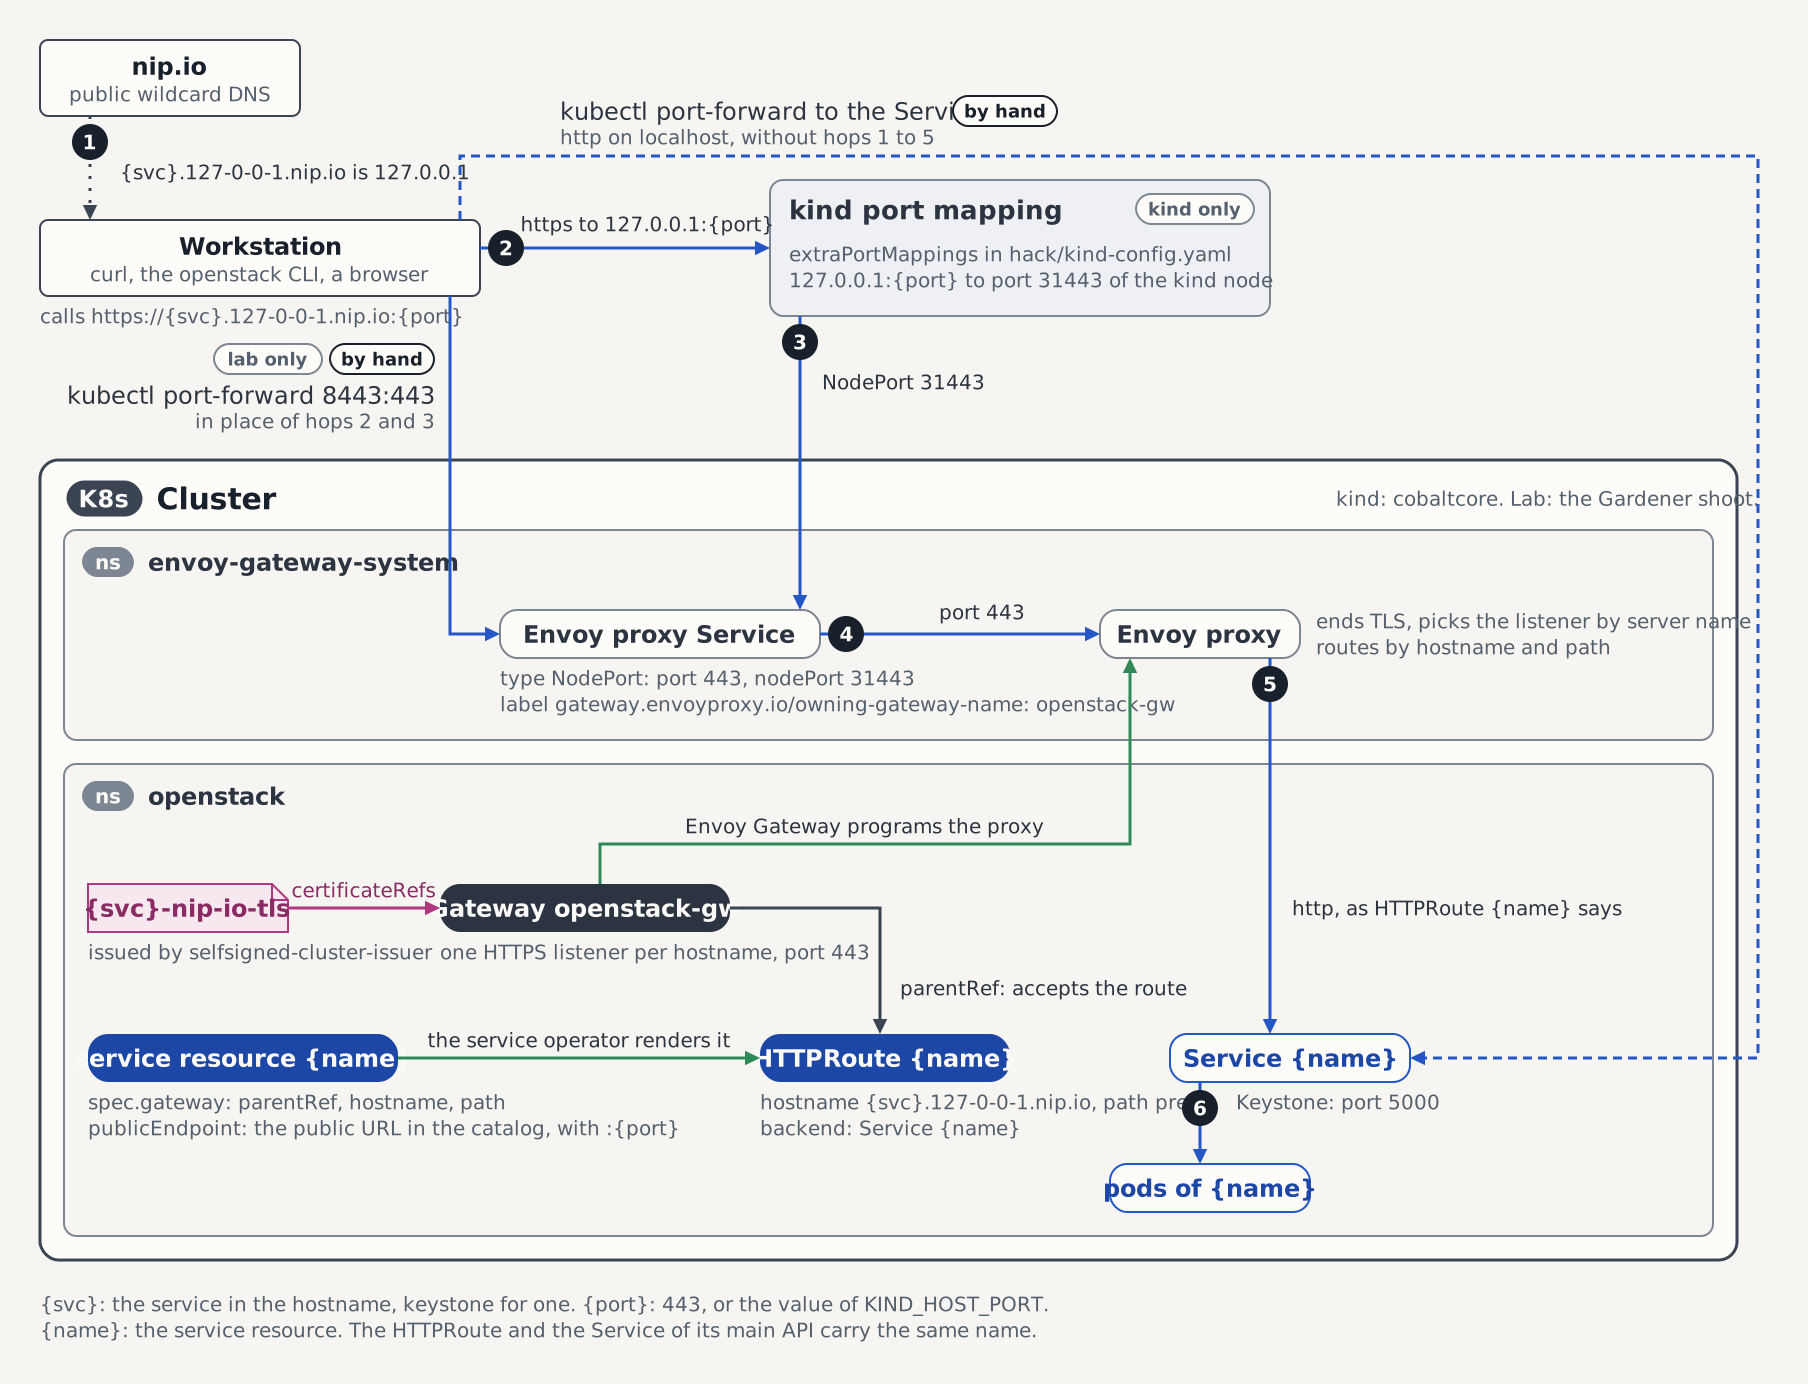
The figure follows such a request from the workstation to the Keystone pods. The request path, hop by hop names each hop and where a first run stops.
Did you set KIND_HOST_PORT=8443 in Step 2?
Then the endpoint is https://keystone.127-0-0-1.nip.io:8443/v3 instead of the default :443. Substitute :8443 everywhere this section writes https://keystone.127-0-0-1.nip.io/..., including OS_AUTH_URL, the verification curl, and any URL printed by openstack catalog. The Gateway hostname and the extracted CA from Option B are unchanged; only the port differs. The matching spec.bootstrap.publicEndpoint is shown in the KIND_HOST_PORT=8443 variant block at the end of Step 7.
Step 1 — Export OpenStack credentials
Read the admin password directly from the cluster and set the standard OpenStack environment variables against the nip.io endpoint:
export OS_AUTH_URL=https://keystone.127-0-0-1.nip.io/v3
export OS_USERNAME=admin
export OS_PASSWORD=$(kubectl get secret keystone-admin -n openstack -o jsonpath='{.data.password}' | base64 -d)
export OS_PROJECT_NAME=admin
export OS_USER_DOMAIN_NAME=Default
export OS_PROJECT_DOMAIN_NAME=Default
Step 2 — Verify access
Check that the API responds and that authentication works:
# Unauthenticated version endpoint (-k skips verification; see below)
curl -k https://keystone.127-0-0-1.nip.io/v3

# Authenticated token request (requires python-openstackclient)
openstack --insecure token issue
A successful curl response begins with {"version": {"id": "v3", ...}}. A successful openstack token issue prints a table with the issued token and its expiry.
Note: The service catalog returned by Keystone contains cluster-internal endpoint URLs (e.g.
http://keystone.openstack.svc.cluster.local:5000/v3). Onlyidentitycommands that authenticate directly againstOS_AUTH_URLwork through the Gateway. Commands that resolve other service endpoints from the catalog (Nova, Neutron, …) require additional Gateway routes or port-forwards for each service.
Accept the self-signed certificate
The Gateway terminates TLS with a certificate issued by the in-cluster selfsigned-cluster-issuer, which is not in any OS trust store. Pick one of:
Option A — quick, one-off runs: pass -k / --insecure on the CLI.
curl -k https://keystone.127-0-0-1.nip.io/v3
openstack --insecure token issue
# Or set the environment variable once per shell:
export OS_INSECURE=true
Option B — trust the issuer (recommended for repeated use): extract the self-signed CA from the cluster and point OpenStack tooling at it.
# Extract the issuer's CA bundle to a local file
kubectl get secret keystone-nip-io-tls -n openstack \
  -o jsonpath='{.data.ca\.crt}' | base64 -d > keystone-ca.crt
export OS_CACERT="$(pwd)/keystone-ca.crt"

# Now curl and the OpenStack CLI accept the cert
curl --cacert "$OS_CACERT" https://keystone.127-0-0-1.nip.io/v3
openstack token issue
Fallback — kubectl port-forward
If the Gateway is unavailable (Envoy still reconciling, nip.io blocked by a corporate resolver, or you are debugging the in-cluster Service directly), fall back to port-forwarding the keystone Service and pointing OS_AUTH_URL at localhost:
# In a separate terminal:
kubectl port-forward svc/keystone -n openstack 5000:5000

# Then, in your shell:
export OS_AUTH_URL=http://localhost:5000/v3
curl http://localhost:5000/v3
openstack token issue
This reaches the ClusterIP Service directly and bypasses the Gateway data plane entirely.
The request path, hop by hop
The numbers are those of the figure at the top of this section.
- Name resolution.
keystone.127-0-0-1.nip.ioresolves to127.0.0.1through the public nip.io service. A resolver with DNS rebind protection drops that answer, andcurlfails withCould not resolve host. The tip in Step 7 of the Quick Start (ControlPlane) has the/etc/hostsentries and the--resolveform. - Host port. The client connects to
127.0.0.1on port443, or on the portKIND_HOST_PORTnames. kind binds that port when it creates the cluster, so a host that may not bind a port below 1024 fails in Step 2 already, withbind: permission deniedor a missingvmnetdsocket. - Port mapping and NodePort. The
extraPortMappingsentry ofhack/kind-config.yamlforwards the host port to port31443of the kind node. That is the NodePort of the Envoy proxy Service inenvoy-gateway-system, which theEnvoyProxyenvoy-nodeportpins. - Envoy proxy and Gateway. The Service hands the connection to the Envoy proxy on port
443. Envoy serves theGatewayopenstack-gwinopenstack, which has one HTTPS listener per hostname. The server name of the TLS handshake selects the listener, and the listener ends TLS with the certificate in the Secretkeystone-nip-io-tls.selfsigned-cluster-issuerissued it, so the client needs--insecureor the CA file of Accept the self-signed certificate. - HTTPRoute. The keystone-operator renders the
HTTPRoutekeystonefromspec.gatewayof the Keystone CR. The route attaches toopenstack-gw, matches the hostname and the path prefix, and names the Servicekeystoneon port5000as its backend. Until the Gateway accepts the route, the CR reportsHTTPRouteReady=Falsewith the reasonHTTPRouteNotAccepted, and a hostname without a route answers404. - Service and pods. Envoy forwards the request over plain HTTP to the pods behind the Service
keystone.
The catalog decides where the request after the token goes. Keystone hands the client the public URL of each service, and for the identity service that is spec.bootstrap.publicEndpoint. With KIND_HOST_PORT=8443 it has to carry :8443, as in the variant at the end of Step 7. The CR of Step 7 itself sets no publicEndpoint, so its catalog holds the cluster-internal URL that the note in Verify access describes. A ControlPlane service block without publicEndpoint advertises https://<hostname> on port 443, which is why the CR of the Quick Start (ControlPlane) carries a publicEndpoint with :8443 for every API.
Two paths leave hops out. The fallback forwards a local port to the Service keystone and skips hops 1 to 5, TLS included. The Quick Start (metal-stack) has no host port to map, so it forwards local port 8443 to the Envoy proxy Service, in place of hops 2 and 3.
Next steps
Keystone is running, you can reach the API, and you have admin credentials. The follow-up guides below cover everything you will actually do with the CR:
| Guide | When to read it |
|---|---|
| Observability & Diagnostics | First stop when something is not Ready — how to read conditions, events, and status fields |
| Day 2 Operations | Scale, upgrade the OpenStack release, rotate Fernet keys manually |
| Advanced Configuration | Brownfield database, autoscaling, network policy, free-form INI, and pointers to every other spec.* option |
| Attach an OIDC Federation Backend | Federate Keystone with an OpenID Connect identity provider (Keycloak walkthrough) |
For the full field reference of the Keystone CR, see Keystone CRD API Reference.
Running the E2E test suite
The project ships a full Chainsaw test suite that validates all operator behaviour. With the cluster running from the steps above, execute:
# The entire tests/e2e/ tree — 45 suites across keystone, keystone-operator,
# c5c3 (ControlPlane), and infrastructure — up to 4 in parallel
make e2e

# Or target a specific suite
chainsaw test \
  --config tests/e2e/chainsaw-config.yaml \
  tests/e2e/keystone/basic-deployment/
A representative selection of the suites under tests/e2e/keystone/ (the directory itself is the canonical inventory; see the E2E test reference for the full catalogue):
| Suite | What it validates |
|---|---|
basic-deployment | Full happy-path reconciliation, API accessibility |
missing-secret | Recovery when a referenced Secret is absent |
fernet-rotation | Manual key rotation with in-place delivery (no rollout) |
scale | Replicas scale from 3 → 5 → 2 correctly |
deletion-cleanup | All owned resources are garbage-collected on CR deletion |
policy-overrides | oslo.policy ConfigMap integration |
middleware-config | WSGI api-paste.ini middleware pipeline customization |
brownfield-database | Explicit database host (no MariaDB CR created) |
image-upgrade | Rolling image update with zero downtime |
invalid-cr | Webhook rejects invalid cron expressions and duplicate plugins |
JUnit XML reports are written to _output/reports/ after each run.
Running Tempest API tests
With the Keystone CR Ready from Step 8, validate the identity API with the OpenStack Tempest test suite:
SERVICE=keystone hack/run-tempest.shThe script handles everything automatically:
- Builds the Tempest container image from the pinned versions in
releases/2026.1/test-refs.yaml - Establishes a port-forward to the Keystone API (skipped if one is already running)
- Runs the identity tests defined in
tests/tempest/keystone-2026-1/
Results land in _output/tempest/:
| File | Content |
|---|---|
tempest-results.xml | JUnit XML — open in your IDE or import into a CI viewer |
tempest.subunit | Raw subunit stream for further processing |
Faster re-runs
The image build is skipped when BUILD_IMAGE=false, which saves ~30 s on repeated runs:
BUILD_IMAGE=false SERVICE=keystone hack/run-tempest.shTeardown
Delete the kind cluster and all its resources:
make teardown-infraThis runs kind delete cluster --name cobaltcore and removes all local state.